Saturday, December 11, 2010

Technical innovation within a company, how do we approach it?

What does it mean to say technology innovation within the context of a company? Is it the the ability to create the next break through innovative project? Is it about creating the next best framework for development? 
It can be so many things. But if you look at it, innovation should be looked at from the ground up approach. We cannot have technology innovation without first improving the skill levels of the existing and the newly joining developers within the company. True that only a few may be involved in creating the next best framework, but there should be proper processes in place so that newly joined people are given thorough knowledge on what goes on the inside of these frameworks.

I often meet people who uses highly optimized, efficient frameworks that are put together by people within a company using the current technologies working together pretty well. So i had a chat with this developer who was working in this project using this framework. This is how it went down;

Me : "Hey this looks pretty neat... How is this functionality handled within the framework?"
New guy : "Oh thats easy, i just put this entry to this file and it works just like that..."
Me: " :S ....."

Thats a puzzled face btw :) ... It was pretty clear that he/she had no idea what was going on in the inside of the framework. In the frameworks point of view this was great because it hides alot of complex details from the developer and handles it internally which is why we standardize good frameworks, but if you look at it from the companies perspective, now we have a few developers who just dont understand what goes on within the framework. So how is that a problem some might ask ( specially the management ;) ).

To the management its great because they see that any new developer can come in and start working on the project from day one which results in maximum efficiency right? WRONG.... If any issue comes up whilst working, they would have no ground knowledge to figure out where it is going wrong. 

Im not saying that every developer should know in and out of the framework their project is working, but at least the high level understanding should be there so that when a problem arise, they will at least know where to start from to find the issue.

So how do we achieve this? When we start off with a particular framework for a project we should ask the main people involved in creating the framework to have a few slides explaining the high level details of why certain things were done the way they are in the current framework. And have at least a one day work shop organised for people who join newly to the respective project.This way the load on the technical leads will be less as they now have new people with a fare amount of knowledge on whats going on in the inside of the project which will prevent them from doing something radical which would break the whole concept of the framework.

And in terms of the company technology innovation has taken place, but this time its not just involving few people who develop the frameworks, but every one including the new people are included as part of the innovation. I believe innovation cannot happen unless the whole set of developers are inline with what we have achieved.

Innovation is a must in every IT company, in this post i just wanted to layout some basics that need to be in place for technical innovation to take place.  If everyone knows where we are heading as a company then the path we should take is clear and transparent to everyone.

Wednesday, December 1, 2010

Plugin Based Architecture With Spring Integration

Introduction :

                                The purpose of this article is to demonstrate that it is possible to achieve a pluggable architecture using Spring Integration and the patterns it supports. If i were to give an introduction to Spring Integration it is a fairly new addition to the spring's solutions suite. It implements most of the Enterprise Integration Patterns currently known which makes it easier for developers as they do not need to re-invent the wheel. Some of the solutions provided by Spring Integration are as follows;

  1. Router
  2. Transformer
  3. Gateway
  4. Splitter
There are many more. As i am just getting my feet wet with Spring integration this is all i have covered up to now.

Pre-requisites :
 In order to run this example you need the following jar files;
  1. com.springsource.org.aopalliance-1.0.0.jar
  2. commons-logging-1.1.1.jar
  3. spring-aop-3.0.3.RELEASE.jar
  4. spring-asm-3.0.3.RELEASE.jar
  5. spring-beans-3.0.3.RELEASE.jar
  6. spring-context-3.0.3.RELEASE.jar
  7. spring-context-3.0.5.RELEASE.jar
  8. spring-context-support-3.0.3.RELEASE.jar
  9. spring-core-3.0.3.RELEASE.jar
  10. spring-expression-3.0.3.RELEASE.jar
  11. spring-tx-3.0.3.RELEASE.jar
  12. spring-integration-core-2.0.0.RC2.jar 

Note that i have used Spring 3.0.3 for this project. If you are using Spring 2.0 the required jars will be less. But as i used Spring Integration 2.0 i wanted to go with Spring 3.0.

Proposed Solution :
I have used the banking domain to demonstrate my example. The solution is to develop a system which will allows you to make payments to any banking system. The architecture is such that all code interfacing to any banking system is developed independently which can later be integrated to the main application as an when required. And you just have to inject the respective spring-integration config xml along with the plugin developed which can be injected to the project. 

In this solution i have done it in the same code base but in real life the plugin development should be in a different module.

Implmentation :
First let me give you an overview diagram of the proposed solution;


As you can see this is a typical architecture for a j2EE project. The controller i have specified here can be anything from struts to JSF to Spring MVC. The Service layer is basically the Spring layer which the controller will mainly be in contact with.

The main point to note is the spring integration layer. This is what injects all the plugins in the plugin repository. Next i will explain in detail the patterns of spring integration used in the solution. The following digram clearly explains this;


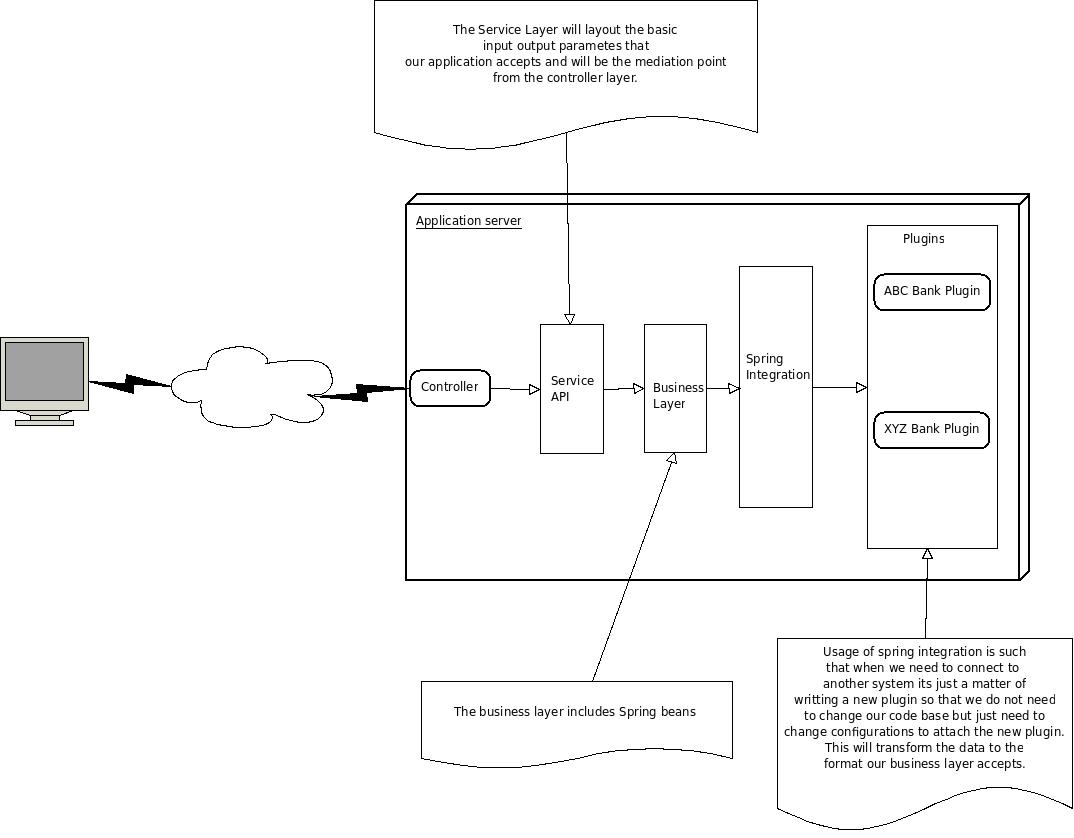
I will not go into detail on this digram as the diagram it self is self explanatory. So now lets get our hands dirty with some code;

First off i will start with the service layer;

package com.paymentgateway.services;

import com.paymentgateway.dto.PaymentRequestDTO;
import com.paymentgateway.dto.PaymentResponseDTO;

/**
 * The service interface is what the client from our application interacts with
 * the client is not aware of spring integration being used.
 * 
 * @author dinuka
 */
public interface PaymentService {

    public PaymentResponseDTO makePayment(PaymentRequestDTO paymentRequestDTO);

}


package com.paymentgateway.services;

import java.util.HashMap;
import java.util.Map;

import org.springframework.beans.factory.annotation.Autowired;
import org.springframework.integration.message.GenericMessage;
import org.springframework.stereotype.Component;

import com.paymentgateway.dto.PaymentRequestDTO;
import com.paymentgateway.dto.PaymentResponseDTO;
import com.paymentgateway.dto.PaymentStatusCode;
import com.paymentgateway.dto.SystemActions;
import com.paymentgateway.gateway.CentralPaymentGateway;

@Component("paymentService")
public class PaymentServiceImpl implements PaymentService {

    @Autowired
    private CentralPaymentGateway gateway;

    @Override
    public PaymentResponseDTO makePayment(PaymentRequestDTO paymentRequestDTO) {
        /**
         * Here you can do any validation checks for null values if you need
         * and throw any relevant exception as needed. For simplicity purposes
         * i have not done so here.
         */

        /**
         * In the header we specify the banking system this message needs to be routed to<br>
         * Then in the
         */
        Map headerMap = new HashMap();
        headerMap.put("BANKING_SYSTEM", paymentRequestDTO.getBankingSystem());
        headerMap.put("ACTION", SystemActions.PAYMENT.toString());
        GenericMessage<PaymentRequestDTO> paymentRequestMsg = new GenericMessage<PaymentRequestDTO>(paymentRequestDTO,
                headerMap);
        PaymentResponseDTO paymentResponseDTO = gateway.makePayment(paymentRequestMsg);

        if (paymentResponseDTO.getStatusCode() == PaymentStatusCode.FAILURE) {
            /**
             * Throw relevant exception
             */
        }
        return paymentResponseDTO;

    }

}


And the DTOs used are as follows;


package com.paymentgateway.dto;

import java.io.Serializable;

/**
 * This DTO holds the data that needs to be passed to the
 * relevant plugin in order to make a payment
 * 
 * @author dinuka
 */
public class PaymentRequestDTO implements Serializable {

    /**
     * 
     */
    private static final long serialVersionUID = 582470760696219645L;

    /**
     * The account number of the customer
     */
    private String accountNumber;

    /**
     * The amount needed to be reduced
     */
    private Double deductAmount;

    /**
     * The First Name of the customer
     */
    private String firstName;

    /**
     * The Last Name of the customer
     */
    private String lastName;

    /**
     * This should ideally be moved to a CommonDTO as this will be reused by all
     * subsequent DTOs. Default banking system is "abc". The client needs to set
     * which banking system is needed to connect to.
     */
    private String bankingSystem = "abc";

    public String getAccountNumber() {
        return accountNumber;
    }

    public void setAccountNumber(String accountNumber) {
        this.accountNumber = accountNumber;
    }

    public Double getDeductAmount() {
        return deductAmount;
    }

    public void setDeductAmount(Double deductAmount) {
        this.deductAmount = deductAmount;
    }

    public String getFirstName() {
        return firstName;
    }

    public void setFirstName(String firstName) {
        this.firstName = firstName;
    }

    public String getLastName() {
        return lastName;
    }

    public void setLastName(String lastName) {
        this.lastName = lastName;
    }

    public String getBankingSystem() {
        return bankingSystem;
    }

    public void setBankingSystem(String bankingSystem) {
        this.bankingSystem = bankingSystem;
    }

    @Override
    public String toString() {
        return "PaymentRequestDTO [accountNumber=" + accountNumber + ", deductAmount=" + deductAmount + ", firstName="
                + firstName + ", lastName=" + lastName + "]";
    }

}


package com.paymentgateway.dto;

import java.io.Serializable;

/**
 * This is the default payment response DTO that every plugin
 * must return back to the system
 * 
 * @author dinuka
 */
public class PaymentResponseDTO implements Serializable {

    /**
     * 
     */
    private static final long serialVersionUID = 2773607380706313950L;

    /**
     * The account number of the customer
     */
    private String accountNumber;

    /**
     * The first name of the customer
     */
    private String firstName;

    /**
     * The last name of the customer
     */
    private String lastName;

    /**
     * The remaining balance in the account of the customer
     */
    private Double availableBalance;

    /**
     * The balance reduced from the customer account
     */
    private Double reducedBalance;

    /**
     * The status code indicating whether the transaction was a success or not
     */
    private PaymentStatusCode statusCode = PaymentStatusCode.SUCCESS;

    /**
     * The transaction id assigned to the relevant transaction
     */
    private Long transationId;

    public String getAccountNumber() {
        return accountNumber;
    }

    public void setAccountNumber(String accountNumber) {
        this.accountNumber = accountNumber;
    }

    public String getFirstName() {
        return firstName;
    }

    public void setFirstName(String firstName) {
        this.firstName = firstName;
    }

    public String getLastName() {
        return lastName;
    }

    public void setLastName(String lastName) {
        this.lastName = lastName;
    }

    public Double getAvailableBalance() {
        return availableBalance;
    }

    public void setAvailableBalance(Double availableBalance) {
        this.availableBalance = availableBalance;
    }

    public Double getReducedBalance() {
        return reducedBalance;
    }

    public void setReducedBalance(Double reducedBalance) {
        this.reducedBalance = reducedBalance;
    }

    public PaymentStatusCode getStatusCode() {
        return statusCode;
    }

    public void setStatusCode(PaymentStatusCode statusCode) {
        this.statusCode = statusCode;
    }

    public Long getTransationId() {
        return transationId;
    }

    public void setTransationId(Long transationId) {
        this.transationId = transationId;
    }

    @Override
    public String toString() {
        return "PaymentResponseDTO [accountNumber=" + accountNumber + ", firstName=" + firstName + ", lastName="
                + lastName + ", availableBalance=" + availableBalance + ", reducedBalance=" + reducedBalance
                + ", statusCode=" + statusCode + ", transationId=" + transationId + "]";
    }

}


package com.paymentgateway.dto;

/**
 * The status codes returned from each plugin indicating
 * if the transaction was a success or not
 * 
 * @author dinuka
 */
public enum PaymentStatusCode {

    SUCCESS, FAILURE
}


package com.paymentgateway.dto;

import com.paymentgateway.util.PaymentRouter;

/**
 * This enum defines the system wide actions
 * We use this name in our {@link PaymentRouter}
 * to decide which channel to route the message
 * 
 * @author dinuka
 */
public enum SystemActions {

    PAYMENT {
        @Override
        public String toString() {

            return "Payment";
        }
    }
}


Those are the DTOs i have used. Moving on, as the second diagram above specified we have defined a Central Gateway & A Router. So lets see how we have implemented those using spring integration;

package com.paymentgateway.gateway;

import org.springframework.integration.message.GenericMessage;

import com.paymentgateway.dto.PaymentRequestDTO;
import com.paymentgateway.dto.PaymentResponseDTO;

/**
 * This interface represents the common gateway which
 * will be used by Spring Integration to wire up the plugins
 * and also will be the central and first point of contact
 * by any client calling our business layer
 * 
 * @author dinuka
 */
public interface CentralPaymentGateway {

    /**
     * This method takes a parameter type of {@link GenericMessage} which wraps&lt;br&gt;
     * an instance of {@link PaymentRequestDTO}. Usage of sending an instance of&lt;br&gt;
     * Generic Message is so that we can add header values which can indicate&lt;br&gt;
     * which banking system to call to
     * 
     * @param paymentRequestDTO
     * @return
     */
    public PaymentResponseDTO makePayment(GenericMessage&lt;PaymentRequestDTO&gt; paymentRequestDTO);
}

Note that the gateway is just an interface defining our input parameters. We have used the GenericMessage defined by Spring integration. If you go back to the service layer implementation you can see that we have populated an instance of GenericMessage with the relevant DTO which is passed onto the gateway. The gateway here acts as a mediation layer.

Moving on with the Router implementation;

package com.paymentgateway.util;

import org.springframework.integration.Message;

/**
 * This is the base Router for All payment related functions
 * We route the message based on the banking system and the action
 * which comes in the header of the message. Ofcourse we can enhance this
 * to put the message on an error queue if the {@link Message} does not have the
 * relevant header values.
 * 
 * @author dinuka
 */
public class PaymentRouter {

    public String resolveBankChannel(Message message) {
        return (String) message.getHeaders().get("BANKING_SYSTEM") + (String) message.getHeaders().get("ACTION")
                + "Channel";
    }
}


Again if you go back to the PaymentServiceImpl class you can see we set the two headers BANKING_SYSTEM and ACTION. The router decides which channel this message should go on. You can see this in the next section when we wire up all this together.

The Spring configurations are as follows;

First off i present to you the main config file named context-config.xml. This mainly injects the service layer beans.

<?xml version="1.0" encoding="UTF-8"?>
<beans xmlns="http://www.springframework.org/schema/beans"
 xmlns:xsi="http://www.w3.org/2001/XMLSchema-instance"
 xmlns:context="http://www.springframework.org/schema/context"
 xsi:schemaLocation="http://www.springframework.org/schema/beans http://www.springframework.org/schema/beans/spring-beans-3.0.xsd
  http://www.springframework.org/schema/context http://www.springframework.org/schema/context/spring-context-3.0.xsd">

 <context:component-scan base-package="com.paymentgateway.services" />
 <context:annotation-config />
</beans>


Next we look at the core configuration where we wire up the Spring Integration related components;

spring-integration-config.xml

<?xml version="1.0" encoding="UTF-8"?>
<beans xmlns="http://www.springframework.org/schema/beans"
 xmlns:xsi="http://www.w3.org/2001/XMLSchema-instance" xmlns:int="http://www.springframework.org/schema/integration"
 xsi:schemaLocation="http://www.springframework.org/schema/beans http://www.springframework.org/schema/beans/spring-beans-3.0.xsd
  http://www.springframework.org/schema/integration http://www.springframework.org/schema/integration/spring-integration-2.0.xsd">

 <!-- The generic input channel which would be used to pass through all messages 
  coming into the Central Gateway -->
 <int:channel id="inputChannel"></int:channel>

 <!-- Here we wire up the Central Gateway which is the central point of access 
  from our service layer -->
 <int:gateway id="gateway" default-request-channel="inputChannel"
  service-interface="com.paymentgateway.gateway.CentralPaymentGateway"
  default-reply-channel="outputChannel"></int:gateway>


 <!-- This is the generic Output channel which will be used by to send the 
  output from any plugin. -->
 <int:channel id="outputChannel"></int:channel>

 <!-- The router is the one who decides which channel to send the message 
  passed in from input channel into. The client should send the name of the 
  Banking system where by 'SearchChannel' keyword is appended by the defaultRouter 
  bean. -->
 <int:router id="centralRouter" ref="defaultRouter" method="resolveBankChannel"
  input-channel="inputChannel"></int:router>

 <bean id="defaultRouter" name="defaultRouter"
  class="com.paymentgateway.util.PaymentRouter" />


</beans>


That is the core configuration which wires up the Gateway, Router and defines the Channels required by the application. Next off lets go into our plugin( of many plugins to come) the ABC Bank Plugin.


First we define the Base plugin interface which all plugin developers should adhere to;


package com.paymentgateway.plugins;

import com.paymentgateway.dto.PaymentRequestDTO;
import com.paymentgateway.dto.PaymentResponseDTO;

/**
 * This is the base plugin interface. All plugin developers should adhere to<br>
 * this interface when they write new plugins connecting to different banking<br>
 * systems.
 * 
 * @author dinuka
 */
public interface BasePlugin {

    public PaymentResponseDTO makePayment(PaymentRequestDTO paymentRequestDTO);

}


And the implementation of this interface is as follows;

package com.paymentgateway.plugins;

import com.paymentgateway.dto.PaymentRequestDTO;
import com.paymentgateway.dto.PaymentResponseDTO;
import com.paymentgateway.dto.PaymentStatusCode;

/**
 * This is the plugin used to connect to the ABC banking system
 * in order to do the payment transaction.
 * 
 * @author dinuka
 */
public class ABCBankPlugin implements BasePlugin {

    @Override
    /**
     * Right now we just return a mock value. But when the true implementation
     * comes you will deal with any connection rellated information
     * at this point.
     */
    public PaymentResponseDTO makePayment(PaymentRequestDTO paymentRequestDTO) {
        PaymentResponseDTO paymentResponseDTO = new PaymentResponseDTO();
        paymentResponseDTO.setAccountNumber("abc123");
        paymentResponseDTO.setAvailableBalance(10000d);
        paymentResponseDTO.setFirstName("Dinuka");
        paymentResponseDTO.setLastName("Arseculeratne");
        paymentResponseDTO.setReducedBalance(500d);
        paymentResponseDTO.setStatusCode(PaymentStatusCode.SUCCESS);
        paymentResponseDTO.setTransationId(1233424234l);
        return paymentResponseDTO;
    }

}


As this is just a mock implementation i have just returned the response DTO with values filled. Now that we have developed our plugin lets wire it up;


abc_bank_plugin-config.xml

<?xml version="1.0" encoding="UTF-8"?>
<beans xmlns="http://www.springframework.org/schema/beans"
 xmlns:xsi="http://www.w3.org/2001/XMLSchema-instance" xmlns:int="http://www.springframework.org/schema/integration"
 xsi:schemaLocation="http://www.springframework.org/schema/beans http://www.springframework.org/schema/beans/spring-beans-3.0.xsd
  http://www.springframework.org/schema/integration http://www.springframework.org/schema/integration/spring-integration-2.0.xsd">

 <!-- Start of ABC Banking System Plugin Injection -->

 <!-- This is the payment channel used for the ABC banking system -->
 <int:channel id="abcPaymentChannel"></int:channel>

 <!-- Wire up the ABC Banking plugin -->
 <bean id="abcBakingSysPlugin" name="abcBakingSysPlugin"
  class="com.paymentgateway.plugins.ABCBankPlugin" />

 <!-- This service activator is used to handle the payment response from 
  ABC banking system -->
 <int:service-activator input-channel="abcPaymentChannel"
  ref="abcBakingSysPlugin" method="makePayment" output-channel="outputChannel"></int:service-activator>

 <!-- End of ABC Banking System Plugin Injection -->
</beans>

And lastly i present a test class just so that you can run the solution given above;

package com.paymentgateway.test;

import org.springframework.context.ApplicationContext;
import org.springframework.context.support.ClassPathXmlApplicationContext;

import com.paymentgateway.dto.PaymentRequestDTO;
import com.paymentgateway.dto.PaymentResponseDTO;
import com.paymentgateway.services.PaymentService;

/**
 * This is a test class showing how it all comes together
 * 
 * @author dinuka
 */
public class TestBankingApp {

    public static void main(String[] args) {
        ApplicationContext context = new ClassPathXmlApplicationContext("context-config.xml",
                "spring-integration-config.xml","abc_bank_plugin-config.xml");

        PaymentService paymentService = (PaymentService) context.getBean("paymentService");

        PaymentRequestDTO paymentRequestDTO = new PaymentRequestDTO();
        PaymentResponseDTO paymentResponseDTO = paymentService.makePayment(paymentRequestDTO);

        /**
         * We just print out the resulting DTO returned from the plugin<br>
         * as this is just a tutorial
         */
        System.out.println(paymentResponseDTO);
    }
}


Thats it. Your done with your plugin architecture. If you ever do develop another plugin all you have to do is implement the BasePlugin Interface and as well as give the wiring up spring file. The following diagram explains the flow in which the message travels which will give you an even clearer picture of what we have accomplished;


Future Enhancements:
  1. Implement a transformer pattern which will do the conversion of DTOs to application specific DTOs.
  2. Introduce an error channel where any error populated will be put in to. 

Thats it guys. Your comments and suggestions are most welcome.

References:

[1] http://static.springsource.org/spring-integration/docs/2.0.0.RELEASE/reference/htmlsingle/

Friday, November 26, 2010

SQL with Hibernate Criteria

Hibernate's Criteria is a very comprehensive API which provides the user alot of flexibility to write dynamic queries. But of course nothing is perfect. I came across a situation where i had to truncate a date field in order to get the correct result set without considering the time portion. While going through the Criteria API I did not find anything which allowed me to do this. And hence in the path for a solution i found out that Criteria allows for plain SQL syntax to be included which i thought was a big plus point because it gives the developer the flexibility without restricting him/her just to the API.

The following code depicts the way you can incorporate plain SQL to your criteria API.

DetachedCriteria testCirteria = DetachedCriteria.forClass(Employee.class);
 SimpleDateFormat dateFormatForSearch = new SimpleDateFormat("dd/MM/yyyy");
 Calendar joinDate = empSearchDTO.getJoinDate();

  if (joinDate != null) {
      /**
 The following uses DateUtils of apache commons to truncate the<br>
 date object.
      **/
      joinDate = DateUtils.truncate(joinDate, Calendar.DATE);
      String dateAsStr = dateFormatForSearch.format(joinDate.getTime());
      testCirteria.add(Restrictions.sqlRestriction("trunc(emp_join_date)=to_date('" + dateAsStr + "','dd/mm/yyyy')"));

   }

As you can see the Criteria API allows to put any valid SQL within the Restrics.sqlRestriction() method. Here i have used the trunc function.

Thats it. If you have any queries or suggestions pls do leave a comment.

Cheers!!!!


Sunday, November 21, 2010

Why the saying "If all you have is a hammer then everything looks like a nail" is so true in the IT industry

"If all you have is a hammer then everything looks like a nail" - Now do not ask me who quoted this or from where i found it.. I vaguely remember seeing it on one of my buddies gtalk status some time back. But the reality of this statement struck me a week back.

We had got this new project in our company. Not a major high scale project. But involved some calculations. Was very interesting. Our company has a few frameworks developed around the years which is used as best practice for many projects. When our architect got this project he without even considering the architectural perspective of the project put in an already existing framework to start development.

Note that this was a project that involved just two(three including the login page) pages. But the technologies included in the framework were as follows;
  1. EJB 3.0
  2. JMS
  3. Spring
  4. Hibernate
  5. Freemarker
  6. Jasper
  7. Struts 2.0
and a few others which i cannot recall at this moment. And i was thinking to my self from all these what we actually needed to do this project. And this was all bundled up into an EAR which came to a size of a thumping 30MB :S... I was amazed at why such a person with so many years of experience would go for such an inappropriate solutions. Of course looking at it from his perspective im sure the higher management would have given him ridiculously tight dead lines to finish the project which lead him into jumping to an existing framework. And also this project was under a maven build. I mean come on, to build a freaking 3 page module it takes around 2mins because of all the dependent modules existing in the framework which is almost always never ever going to be used within this project. Talk about time waste.

In my opinion my technology stack for this project would have been using a simple ANT build using Spring to wire up and handle transactions with Hibernate and struts to handle the mediation layer and bundle it up as a WAR. Ofcourse some time back i did a solution where all the commonly used JARs were bundled up in a single jar which was deployed only once(Note that we use JBoss A/S as our application servers). This is because if you really look at it, the project it self is only a few MBs of size. But what takes most of the space is the third party libraries we use. This solution lead to lesser deployment time because else it takes alot of time to do a remote deployment to the servers if the file size is large.

The fact lies with why we cant think beyond what already exists. To think the same framework works in all situations is like thinking one antibiotic will cure all viruses. Of course time lines are an essential component. But if you really look at it, using the right tool for the right job will help you finish up the job with time to spare rather than using an existing framework and removing all parts which you do not need which is both time consuming and error prone. 

So my theory is dont have just a hammer, but have a tool kit with various options under your belt which will serve you and your team mates better where by will be better for your company as well.

Friday, October 29, 2010

XML Parsing with AXIOM

Recently a friend of mine inquired about what the best way is to parse XML. I have to say im not an expert in this subject but from what i have read i instantly remembered that AXIOM is a pull parser which means that when you request for a particular element within your XML document push parsers will give you that exact element where as other pull parsers will build the whole XML document before handing over the relevant document element to you. Hence AXIOM will leave the least memory foot print.

The problem was i could not find a clear and concise tutorial explaining how to deal with XML using AXIOM. After playing around with it i figured out how to manipulate XML with AXIOM which i should say is so much better that the cumbersome code you have to deal with when manipulating with DOM or JDOM.

So following i show a simple example of how to manipulate XML with AXIOM;

First off i present the XML i will be parsing

<?xml version="1.0" encoding="utf-8" ?>
<my_servers>
 <server>
  <server-name>PROD</server-name>
  <server-ip>xx.xx.xx.xx</server-ip>
  <server-port>80</server-port>
  <server-desc>Running A/S</server-desc>
 </server>

 <server>
  <server-name>PROD2</server-name>
  <server-ip>xx1.xx1.xx1.xx1</server-ip>
  <server-port>80</server-port>
  <server-desc>Running A/S</server-desc>
 </server>
</my_servers>

Next i wrote a factory method to handout StaxBuilder instances depending on the XML file you pass. I have done as such so as to minimize the task of creating new StaxBuilder instances everytime.


import java.io.FileInputStream;
import java.io.FileNotFoundException;
import java.util.Map;
import java.util.concurrent.ConcurrentHashMap;

import javax.xml.stream.XMLStreamException;

import org.apache.axiom.om.impl.builder.StAXOMBuilder;

public class AxiomStaxBuilderFactory {

    private static Map<String, StAXOMBuilder> staxBuilderMap = new ConcurrentHashMap<String, StAXOMBuilder>();

    /**
     * The factory method stores the {@link StAXOMBuilder} instance created for each XML file<br>
     * passed in so that we do not need to create unnecessary objects every time.<br>
     * An instance of {@linkplain ConcurrentHashMap} is used so as to make the<br>
     * instances thread safe.
     * 
     * @param xmlFilePath the path of the XML file
     * @return an instance of the {@link StAXOMBuilder} from the cache or newly created
     */
    public static StAXOMBuilder getAxiomBuilderForFile(String xmlFilePath) {
        StAXOMBuilder staxBuilder = null;
        if (staxBuilderMap.containsKey(xmlFilePath)) {
            staxBuilder = staxBuilderMap.get(xmlFilePath);
        } else {
            try {
                staxBuilder = new StAXOMBuilder(new FileInputStream(xmlFilePath));
                staxBuilderMap.put(xmlFilePath, staxBuilder);
            } catch (FileNotFoundException e) {
                throw new AxiomBuilderException(e);
            } catch (XMLStreamException e) {
                throw new AxiomBuilderException(e);
            }
        }

        return staxBuilder;

    }
}


I have used a Concurrent Hash map so that this wil work well in a multi threaded application. If your not bothered with that you might as well use a normal HashMap for better performance which in this case would be negligible. I have also used a custom exception as i did not want the user to have to handle exceptions so i wrapped the exceptions thrown to my custom run time exception. Following is that code. Nothing major just a normal extension of the RuntimeException class;

/**
 * This exception class wraps all exceptions thrown from the Axiom API
 * as the user does not need to be bound by such checked exceptions.
 * @author dinuka
 *
 */
public class AxiomBuilderException extends RuntimeException {

    /**
     * 
     */
    private static final long serialVersionUID = -7853903625725204661L;

    public AxiomBuilderException(Throwable ex) {
        super(ex);
    }

    public AxiomBuilderException(String msg) {
        super(msg);
    }
}


Next off i have written a utility class to deal with the XML parsig. Ofcourse this is not needed but i just had it so that client calls will be much cleaner without having to deal with XML releated coding which would be abstracted by the utility class. Note -The current method only reads the root level elements passed in.


import java.util.ArrayList;
import java.util.HashMap;
import java.util.Iterator;
import java.util.List;
import java.util.Map;

import javax.xml.namespace.QName;

import org.apache.axiom.om.OMElement;
import org.apache.axiom.om.impl.builder.StAXOMBuilder;

/**
 * The utility class provides abstraction to users so that <br>
 * the user can just pass in the xml file name and the node he/she<br>
 * wants to access and get the values without having to bother with<br>
 * boilerplate xml handling info.
 * 
 * @author dinuka
 */
public class AxiomUtil {

    /**
     * This method is used if you have for example a node with multiple children<br>
     * Note that this method assumes the node in query is within the root element
     * 
     * @param xmlFilePath the path of the xml file
     * @param nodeName the node name from which you want to retrieve values
     * @return the list containing key value pairs containing the values of the sub elements within<br>
     *         the nodeName passed in.
     */
    public static List<Map<String, String>> getNodeWithChildrenValues(String xmlFilePath, String nodeName) {
        List<Map<String, String>> valueList = new ArrayList<Map<String, String>>();

        StAXOMBuilder staxBuilder = AxiomStaxBuilderFactory.getAxiomBuilderForFile(xmlFilePath);

        OMElement documentElement = staxBuilder.getDocumentElement();
        Iterator nodeElement = documentElement.getChildrenWithName(new QName(nodeName));

        while (nodeElement.hasNext()) {
            OMElement om = (OMElement) nodeElement.next();

            Iterator it = om.getChildElements();
            Map<String, String> valueMap = new HashMap<String, String>();
            while (it.hasNext()) {
                OMElement el = (OMElement) it.next();

                valueMap.put(el.getLocalName(), el.getText());

            }

            valueList.add(valueMap);
        }
        return valueList;
    }

}


And finally i give to you a sample class to test out the XML parsing example i have presented to you here.


import java.util.List;
import java.util.Map;

/**
 * Test class depicting the use of Axiom parsing XML
 * 
 * @author dinuka
 */
public class testServerConfigXML {

    public static void main(String argv[]) {

        List<Map<String, String>> values = AxiomUtil.getNodeWithChildrenValues("/home/dinuka/serverInfo.xml", "server");

        for (Map<String, String> mapVals : values) {
            for (String keys : mapVals.keySet()) {
                System.out.println(keys + "=" + mapVals.get(keys));
            }
        }

    }

}


Thats it. If you have any queries or any improvement points you see pls do leave a comment which would be highly appreciated. Hope this helps anyone out there looking for a similar basic tutorial on AXIOM XML parsing.


Cheers

Thursday, October 14, 2010

My First Experience with MongoDB

I know im pretty much slow to this concept of NoSQL. But nevertheless better late than never right ? :) ... So this is my first post on getting my feet wet in the world NoSQL. I have to say coming from a RDMS background it was not much hard to get my self familiar with MongoDB. Ofcourse there are a number of NoSQL implementations out there. But going through each of them MongoDB was the one i felt inclined to go with as the learning curve for me using it was pretty low.

So i was reading through multiple posts, articles to get a feel of what MongoDB can really do. After going through that i wanted to try out an example to get a feel of it. So i first downloded Mongo DB from here.  Im on Ubuntu 8.04 so i downloaded the Linux 32-bit one. They do say about a limitation of using the 32-bit version. But i was not much concerned as this is my stage of getting used to it.

So coming from a J2EE development background mostly using annotations i was inclined to search for a solution using annotations to deal with MongoDB so that the transition from usual JPA/Hibernate mappings to MongoDB will be minimal. I know that the way of thinking in terms of MongoDB is different to the way we map things in a traditional RDMS as there is no concept as foreign keys etc. But i wanted the transition to be minimal. So going on those steps i found this project done by google supporting annotation based mapping facility for the MongoDB called Morphia. This was exactly what i needed.

So i did a quich write up to test it. You need to download Morphia  and also get the Java driver for MongoDB. Next start your mongodb. Go to your MongoDB installation path's bin directory and do as follows;


So i specified the parameters as 


./mongod --dbpath<path_to_your_data_store>;
This starts Mongo DB in its default port. Afterwards i present to you a simple program using the above mentioned libraries.


I have a simple class called MyInfo which has an embedded object called Address. Code is as follows;

import org.bson.types.ObjectId;

import com.google.code.morphia.annotations.Entity;
import com.google.code.morphia.annotations.Id;


@Entity("myInfo")
public class MyInfo {

    @Id ObjectId id;
    private String name;
    private int age;
    
    private Address address;
    
    public ObjectId getId() {
        return id;
    }
    public void setId(ObjectId id) {
        this.id = id;
    }
    public String getName() {
        return name;
    }
    public void setName(String name) {
        this.name = name;
    }
    public int getAge() {
        return age;
    }
    public void setAge(int age) {
        this.age = age;
    }
    public Address getAddress() {
        return address;
    }
    public void setAddress(Address address) {
        this.address = address;
    }
    
}


import com.google.code.morphia.annotations.Embedded;

@Embedded
public class Address {
    
    
    private String adderss1;
    
    private String address2;

    public String getAdderss1() {
        return adderss1;
    }

    public void setAdderss1(String adderss1) {
        this.adderss1 = adderss1;
    }

    public String getAddress2() {
        return address2;
    }

    public void setAddress2(String address2) {
        this.address2 = address2;
    }
    
    
}


Those were my domain classes. Next i present the main class which does the storing of my objects within the MongoDB.

import java.net.UnknownHostException;

import com.google.code.morphia.Datastore;
import com.google.code.morphia.Morphia;
import com.mongodb.Mongo;
import com.mongodb.MongoException;

/**
 * This class Creates a test Monog Connection and persists an instance of {@linkplain MyInfo}
 * @author dinuka
 *
 */
public class MainMongoPersist {

    public static void main(String[] args) throws UnknownHostException, MongoException {
        
        /**
         * Creates a connection on the local Mongo DB server
         */
        Mongo mon = new Mongo("localhost",27017);
        
        /**
         * Add the classes annotated with @Entity.
         * Note that you do not need to add the Address as we Embedded it within 
         * the MyInfo instance. 
         */
        Morphia morphia = new Morphia();
        morphia.map(MyInfo.class);
        
        /**
         * Create a data source by giving the DB you want to connect to.
         */
        Datastore ds = morphia.createDatastore(mon, "mydb");
        
        MyInfo inf = new MyInfo();
        inf.setName("Roshan123");
        inf.setAge(1);
        Address ad = new Address();
        ad.setAdderss1("No 42");
        ad.setAddress2("3424234234");
        inf.setAddress(ad);
        
        /**
         * Persist the object
         */
        ds.save(inf);
    }
}


That is it. Now i start my mongo process which allows me to query the DB to check whether the data really did get stored within the DB. So i go to my mongo installation path's bin directory and start a mongo client. Following snippet shows how to do that;


dinuka@dinuka:~/software/mongodb-linux-i686-1.6.3/bin$ ./mongo 
MongoDB shell version: 1.6.3
connecting to: test
> use mydb
switched to db mydb
> db.myInfo.find();
{ "_id" : ObjectId("4cb6d81d166cacce8ab4e4e8"), "className" : "MyInfo", "name" : "Dinuka", "stars" : 1 }
{ "_id" : ObjectId("4cb6d8f71757accef6a9784d"), "className" : "MyInfo", "name" : "Roshan", "stars" : 1 }
{ "_id" : ObjectId("4cb6d910f9d0accee936df12"), "className" : "MyInfo", "name" : "Roshan123", "stars" : 1, "address" : { "adderss1" : "fsdfsdfsd", "address2" : "3424234234" } }
> 


I switched the database as i used the database called mydb which is the one i specified when i created the data source. This is just a basic write up on Mongo DB. There is so much more in it which i am on the verge of learning. As it is a very interesting topic to explore on for me. Up to now the potential i see of using Mongo DB is;

  • It allows you to have a dynamic schema so that adding a column will be no hassle. 
  • You can scale the database with ease using the auto sharding facility provided by MongoDB.
  • I love the fact that you can think in terms of how you map your json data in the front end to the database as it is.
Many more is there which im not familiar with so i rather not comment on anything i do not know :) .. If anyone out there can mention any experience using this in a production system with regards to performance and reliability that would be a great help.

Would love to hear your thoughts/comments on this regards.


And the journey of learning Mongo continues............

Thursday, September 23, 2010

APIs you can use in your web site

This article lists down some useful web APIs you can use in your day to day web site development. I found the Google chart API to be quite impressive.

Wednesday, September 22, 2010

Caching with Hazlecast using Spring

Found an article explaining how to wire up Hazlecast caching with Spring. You can check out the article here.

Monday, September 20, 2010

Stored procedures with hibernate

In an earlier post i wrote up an article explaining how to call stored procedures using Spring's StoredProcedureCall template. This i believe is a very clean solution to handle all stored procedure related details. But this article is for those who already use the hibernate template and want to get things done using that without going into much details of using the Spring's StoredProcedureCall.

So i will guide you step by step on how to achieve this.
  • Following is a sample stored procedure. Note that this is not a complete proc, but just an extract.


    create or replace PROCEDURE         MYSYS_P_MY_TEST_PROC
        ( 
            p_recordset      OUT SYS_REFCURSOR,
            p_airport_iata_id IN varchar2  ,
            p_flight_number   IN varchar2  ,
            p_flight_dep_date IN varchar2  
        )
    

          One very important thing to note here is that if your using named queries to call stored procedures there is one limitation as specified in the hibernate specification. That is, that the OUT parameter must be the first parameter in your procedure and it should be a SYS_REFCURSOR. Else it would not work.


    • Next you need to define an entity representing the data output by your procedure.


      @Entity
      @NamedNativeQuery(name = "getFlightLoadData", query = "call MYSYS_P_MY_TEST_PROC
      (?, :p_airport_iata_id,:p_flight_number,:p_flight_dep_date)", callable = true, resultClass = FlightLoadData.class)
      public class FlightLoadData implements Serializable {
      
       private static final long serialVersionUID = -6259506689335159484L;
      
       @Id
          private int rownum;
      
          @Column(name="DEP_IATA_CODE")
          private String depIATACode;
      
        /**
           * @return the rownum
           */
          public int getRownum() {
              return rownum;
          }
      
          /**
           * @param rownum the rownum to set
           */
          public void setRownum(int rownum) {
              this.rownum = rownum;
          }
      
          /**
           * @return the depIATACode
           */
          public String getDepIATACode() {
              return depIATACode;
          }
      
          /**
           * @param depIATACode the depIATACode to set
           */
          public void setDepIATACode(String depIATACode) {
              this.depIATACode = depIATACode;
          }
      
      }

      Although this is not an entity per se, you need to define it as an entity in order to use it with the hibernate template. Afterwards you define a named native query, give it a name, the question mark as the first parameter is the OUT parameter of the procedure.

      One very important thing to note here is the user of @Id annotation. We have given it the name rownum. For us to get the results of the ref cursor and map it to the domain object there has to be a unique identifier within the result set. ROWNUM as defined here says

      rownum is a pseudo column. It numbers the records in a result set. The first record that meets the where criteria in a select statement is given rownum=1, and every subsequent record meeting that same criteria increases rownum.
      So when you write into your ref cursor make sure you select the rownum as your first column in the result set.

      The other two important attributes within the @NamedNativeQuery are;

      • callable = true  - Specifies to execute the store procedure.
      • resultClass = FlightLoadData.class  - Specifies the result to be mapped to the following DTO.

      Finally i will present to you the way you will call this procedure using the hibernate template;

      List<FlightLoadData> result = (List<FlightLoadData>) getHibernateTemplate().execute(new HibernateCallback() {
      
                  @Override
                  public Object doInHibernate(final Session session) throws HibernateException, SQLException {
                      return session.getNamedQuery("getFlightLoadData").setString("p_airport_iata_id", airportIATAID)
                              .setString("p_flight_number", flightNo).setString("p_flight_dep_date", date).list();
                  }
              });


      Thats it guys. Im sure the last coding snippet is self explanatory and hence i would not delve into the details.

      If you do have any queries pls do leave a comment and i will be more than happy to help you.

      Cheers!!!!

      Monday, August 30, 2010

      Declarative Transaction Defintion With Spring

      In the current project i was working we were using spring 2.0 and was declaring transactions the old way using a ProxyFactoryBean and injecting the transaction interceptor to the Proxy. Although this works fine it just clutters your spring configuration IMO. Recently we migrated our application to Spring 3.0 and i thought we should move away from the old ways of doing things with Spring. Following i show you the old way of how we did transaction injection and the new way of doing it with less XML configuration.

      First of all i present the OLD WAY:

      <bean name="transactionInterceptor"
        class="org.springframework.transaction.interceptor.TransactionInterceptor">
        <property name="transactionManager">
         <ref bean="transactionManager" />
        </property>
        <property name="transactionAttributes">
         <props>
          <prop key="create*">PROPAGATION_REQUIRED</prop>
          <prop key="remove*">PROPAGATION_REQUIRED</prop>
          <prop key="*">PROPAGATION_SUPPORTS,readOnly
          </prop>
         </props>
        </property>
       </bean>
      
      
       <bean id="myTestDAOTarget" class="com.test.dao.hibernate.MyTestDAOImpl" scope="prototype">
               <property name="sessionFactory">
                  <ref local="mySessionFactory"/>
              </property>
          </bean>
      
          <bean id="myTestDAOProxy" class="org.springframework.aop.framework.ProxyFactoryBean">
              <property name="proxyInterfaces">
                  <value>com.test.dao.MyTestDAO</value>
              </property>
              <property name="interceptorNames">
               <list>
                <value>transactionInterceptor</value>
                <value>myTestDAOTarget</value>
                  </list>            
              </property>
          </bean>


      As you can see here we have defined the transaction interceptor and injected the same within our myTestDAOProxy bean definition under the "interceptorNames" property. The thing with this is if you want to define a new DAO you have to define two bean definitions because we are dealing with proxying manually. Ofcourse we can write an XDoclet to generate this. But then again what we are trying to achieve is clarity.

      So now i present the NEW way of doing the same with less code;

      <?xml version="1.0" encoding="UTF-8"?>
      <beans xmlns="http://www.springframework.org/schema/beans"
       xmlns:xsi="http://www.w3.org/2001/XMLSchema-instance" xmlns:aop="http://www.springframework.org/schema/aop"
       xmlns:tx="http://www.springframework.org/schema/tx" xmlns:jee="http://www.springframework.org/schema/jee"
       xsi:schemaLocation="
             http://www.springframework.org/schema/beans http://www.springframework.org/schema/beans/spring-beans-3.0.xsd
             http://www.springframework.org/schema/tx http://www.springframework.org/schema/tx/spring-tx-3.0.xsd
             http://www.springframework.org/schema/aop http://www.springframework.org/schema/aop/spring-aop-3.0.xsd
          http://www.springframework.org/schema/jee http://www.springframework.org/schema/jee/spring-jee-3.0.xsd">
          
          
          <aop:aspectj-autoproxy />
      
        <tx:advice id="tx-advice">
        <tx:attributes>
         <tx:method name="create*" propagation="REQUIRED" />
         <tx:method name="remove*" propagation="REQUIRED" />
         <tx:method name="update*" propagation="REQUIRED" />
         <tx:method name="*" propagation="SUPPORTS"/>
        </tx:attributes>
       </tx:advice>
      
       <aop:config>
      
        <aop:pointcut id="advice" expression="target(com.test.dao.MyTestDAO)" />
         <aop:advisor pointcut-ref="advice" advice-ref="tx-advice" />
      
       </aop:config>
      
       <bean id="myTestDAO" class="com.test.dao.hibernate.MyTestDAOImpl" scope="prototype">
               <property name="sessionFactory">
                  <ref local="mySessionFactory"/>
              </property>
          </bean>
      
      
      </beans>
      

      Thats it. Now the proxy is created for you automatically. One thing to note hear is i have given the AOP expression as target(com.test.dao.MyTestDAO). What this tells is to weave into any class that implements the interface 'MyTestDAO'. You can of course have a BaseDAO in your DAO layer code so that you can specify that in this place which will enable to you to inject transaction capabilities to all your DAO classes.

      Thats all folks. If you have any queries or suggestions pls do drop a comment which is always highly appreciated.

      Wednesday, July 21, 2010

      Some Cool Ubuntu Plugins to have

      Found this article giving some cool things you can use if your on Ubuntu. Check it out.

      Thursday, July 15, 2010

      Running embedded JMS with Spring

      I was experimenting on how to run active mq embedded with spring so as to ease out unit testing of queues. First i looked at the doc provided in active mq but the thing is the namespace URI provided in the site was invalid and as such it didnt work right out of the box. Then i stumbled upon this article which showed the correct namespace to include. And also you need to include xbean-spring-3.4.jar. Here is a sample i have done;

      First we create the message sender;


      import javax.jms.Destination;
      import javax.jms.JMSException;
      import javax.jms.Message;
      import javax.jms.Session;
      import javax.jms.TextMessage;

      import org.springframework.jms.core.JmsTemplate;
      import org.springframework.jms.core.MessageCreator;

      public class JMSSender {

      private JmsTemplate jmsTemplate;

      private Destination destination;

      public void sendMessage(final String message) {
      jmsTemplate.send(destination, new MessageCreator() {

      @Override
      public Message createMessage(Session arg0) throws JMSException {

      TextMessage msg = arg0.createTextMessage();
      msg.setText(message);
      return msg;
      }
      });
      }

      /**
      * @return the jmsTemplate
      */
      public JmsTemplate getJmsTemplate() {
      return jmsTemplate;
      }

      /**
      * @param jmsTemplate the jmsTemplate to set
      */
      public void setJmsTemplate(JmsTemplate jmsTemplate) {
      this.jmsTemplate = jmsTemplate;
      }

      /**
      * @return the destination
      */
      public Destination getDestination() {
      return destination;
      }

      /**
      * @param destination the destination to set
      */
      public void setDestination(Destination destination) {
      this.destination = destination;
      }
      }


      This will just send the message to the specified destination. The destination will be specified in the spring configuration which we will look at in just a little moment.

      Next i write my JUnit test class to test the embedded messaging queue.


      import javax.jms.Destination;
      import javax.jms.JMSException;
      import javax.jms.TextMessage;

      import org.junit.Test;
      import org.junit.runner.RunWith;
      import org.springframework.beans.factory.annotation.Autowired;
      import org.springframework.beans.factory.annotation.Qualifier;
      import org.springframework.jms.core.JmsTemplate;
      import org.springframework.test.context.ContextConfiguration;
      import org.springframework.test.context.junit4.SpringJUnit4ClassRunner;

      @RunWith(SpringJUnit4ClassRunner.class)
      @ContextConfiguration(locations = "classpath:test-common-context.xml")
      public class JMSTest {

      @Autowired
      private JMSSender jmsSender;

      @Autowired
      @Qualifier("consumer")
      private JmsTemplate jmsTemplate;

      @Autowired
      private Destination destination;

      @Test
      public void testJMSSender() {
      jmsSender.sendMessage("test");
      TextMessage msg = (TextMessage) jmsTemplate.receive(destination);
      System.out.println("***********************");
      try {
      System.out.println(msg.getText());
      } catch (JMSException e) {
      // TODO Auto-generated catch block
      e.printStackTrace();
      }
      System.out.println("***********************");
      }
      }


      I have specified the configuration file with the annotation. In that i just import the active mq configuration file which im going to show you now.


      <beans xmlns="http://www.springframework.org/schema/beans"
      xmlns:xsi="http://www.w3.org/2001/XMLSchema-instance" xmlns:amq="http://activemq.apache.org/schema/core"
      xsi:schemaLocation="
      http://www.springframework.org/schema/beans http://www.springframework.org/schema/beans/spring-beans-2.5.xsd
      http://activemq.apache.org/schema/core http://activemq.apache.org/schema/core/activemq-core-5.2.0.xsd">


      <!-- lets create an embedded ActiveMQ Broker -->
      <amq:broker useJmx="false" persistent="false">
      <amq:transportConnectors>
      <amq:transportConnector uri="tcp://localhost:0" />
      </amq:transportConnectors>
      </amq:broker>

      <!-- ActiveMQ destinations to use -->
      <amq:queue id="destination"
      physicalName="org.apache.activemq.spring.Test.spring.embedded" />


      <!--
      JMS ConnectionFactory to use, configuring the embedded broker using
      XML
      -->
      <amq:connectionFactory id="jmsFactory" brokerURL="vm://localhost" />


      <!-- Spring JMS Template -->
      <bean id="myJmsTemplate" class="org.springframework.jms.core.JmsTemplate">
      <qualifier value="producer" />
      <property name="connectionFactory">
      <!-- lets wrap in a pool to avoid creating a connection per send -->
      <bean class="org.springframework.jms.connection.SingleConnectionFactory">
      <property name="targetConnectionFactory">
      <ref local="jmsFactory" />
      </property>
      </bean>
      </property>
      </bean>

      <bean id="consumerJmsTemplate" class="org.springframework.jms.core.JmsTemplate">
      <qualifier value="consumer" />
      <property name="connectionFactory" ref="jmsFactory" />
      </bean>

      <!-- a sample POJO which uses a Spring JmsTemplate -->
      <bean id="producer"
      class="JMSSender">
      <property name="jmsTemplate">
      <ref bean="myJmsTemplate"></ref>
      </property>

      <property name="destination">
      <ref bean="destination" />
      </property>
      <!--

      <property name="messageCount"> <value>10</value> </property>
      -->
      </bean>


      </beans>


      That is all you need. And now you can just run the jUnit test and you can see the result. Ofcourse there are better ways of hooking up the jms template, but the purpose of this article was not to exemplify that. If you do have any queries do let me know.


      Cheers

      Friday, July 2, 2010

      An Abstraction to use HibernateDAOSupport

      In this post i would like to share with you guys on this DAO abstraction i have created by using HibernateDAOSupport for the previously mentioned development framework im currently creating. First of all i start with defining my BaseDAO.


      package com.dyna.frm.commons.dao;

      import java.io.Serializable;

      import org.springframework.transaction.annotation.Propagation;
      import org.springframework.transaction.annotation.Transactional;

      @Transactional(propagation = Propagation.REQUIRED, readOnly = false)
      public interface BaseDAO<T, PK extends Serializable> {

      public void createOrUpdate(T... entity);

      @Transactional(propagation = Propagation.NOT_SUPPORTED, readOnly = true)
      public T read(PK id);

      public void update(T id);

      public void delete(PK... id);

      }


      Here i have created four methods to deal with the main four CRUD operations that anyone will have to deal with. I have specified the transactions at the interface layer and have opted to go for annotation based transactions due to rarity of transactions being changed and i didnt want to clutter by XML configuration with it. At the top most layer i have defined as transaction equired and read only false. This is because only the read method does not need a transaction and whilst others do. As you know REQUIRED will create a new transaction if one is not already provided.

      Note that i have used NOT_SUPPORTED for the read method as retrievals do not need to run within a transaction and hence it is just over head to create a transaction for retrievals.

      Moving on next i show you the BaseDAO implementation class;


      package com.dyna.frm.commons.dao.daoimpl;

      import java.util.ArrayList;
      import java.util.Arrays;
      import java.util.List;

      import org.springframework.orm.hibernate3.support.HibernateDaoSupport;

      import com.dyna.frm.commons.dao.BaseDAO;

      public class BaseDAOHiberanateImpl<T, PK extends java.io.Serializable> extends
      HibernateDaoSupport implements BaseDAO<T, PK> {

      private Class<T> entityClass;


      public BaseDAOHiberanateImpl(Class<T> entityClass) {
      this.entityClass = entityClass;
      }

      @Override
      public void createOrUpdate(T... entity) {

      getHibernateTemplate().saveOrUpdateAll(Arrays.asList(entity));

      }

      @SuppressWarnings("unchecked")
      @Override
      public T read(PK id) {
      return (T) getHibernateTemplate().get(entityClass, id);

      }

      @Override
      public void update(T entity) {
      getHibernateTemplate().update(entity);

      }

      @Override
      public void delete(PK... id) {
      if (id.length == 1) {
      T entity = read(id[0]);
      getHibernateTemplate().delete(entity);
      } else {
      List<T> entityList = new ArrayList<T>();
      for (PK pk : id) {
      T entity = read(pk);
      entityList.add(entity);
      }
      getHibernateTemplate().deleteAll(entityList);
      }

      }

      }


      As you can see here i have extended from Spring's HibernateDAOSupport class. The good thing about using the HibernateTemplate is that it encapsulates all those nitty gritty database exceptions and wraps it around Spring's DAO exception stack. The good thing is Spring's Exceptions are runtime and hence are not forced to catch any exceptions if you do not need to.

      The best approach of handling exceptions is i believe through writing an Exception Interceptor to intercept all your DAO calls and you can catch the ones you only need in your application and wrap it with your own custom application specific exceptions.

      Anyhow moving on with the implementation class for create or update i have used the saveOrUpdate method of Hibernate template and as i have used var args in the method parameters i can process both single entity persistence as well as batch entity persistence within one method.All the other methods are self explanatory as i see it. For delete also as i have provided the ability for the user to send a collection of PK values to delete from i have again used two different methods from the Hibernate template checking whether the varg args length is greater than zero.

      Next i show you a sample usage of this base dao implementation i have provided by creating a DAO for a hypothetical Person entity;

      package com.dyna.frm.controller.dao;

      import com.dyna.frm.commons.dao.BaseDAO;
      import com.dyna.frm.controller.domain.Person;

      public interface PersonDAO extends BaseDAO<Person, Long>{

      }


      package com.dyna.frm.controller.dao.hibernate;

      import org.springframework.beans.factory.annotation.Qualifier;

      import com.dyna.frm.commons.dao.daoimpl.BaseDAOHiberanateImpl;
      import com.dyna.frm.controller.dao.PersonDAO;
      import com.dyna.frm.controller.domain.Person;


      @Qualifier("personDAOHibernate")
      public class PersonDAOImpl extends BaseDAOHiberanateImpl<Person, Long> implements PersonDAO{


      public PersonDAOImpl() {
      super(Person.class);
      }


      }


      I have defined a qualifier here because if i ever needed to use JpaTemplate then i wouldnt have conflicts when i try to Auto wire based on the PersonDAO interface.As you can see within the constructor i have called the BaseDAOImpl class constructor passing in the entity we need to manage within this DAO class. And all other basic methods are now available to this PersonDAO and you can add any additional methods you need as you progress.

      And finally i give you the XML configuration needed to wire this up;


      <?xml version="1.0" encoding="UTF-8"?>
      <beans xmlns="http://www.springframework.org/schema/beans"
      xmlns:xsi="http://www.w3.org/2001/XMLSchema-instance" xmlns:aop="http://www.springframework.org/schema/aop"
      xmlns:tx="http://www.springframework.org/schema/tx"
      xsi:schemaLocation="http://www.springframework.org/schema/beans
      http://www.springframework.org/schema/beans/spring-beans-2.5.xsd
      http://www.springframework.org/schema/aop
      http://www.springframework.org/schema/aop/spring-aop-2.5.xsd
      http://www.springframework.org/schema/tx
      http://www.springframework.org/schema/tx/spring-tx-2.5.xsd">

      <tx:annotation-driven />

      <!-- JTA Transaction Mgr is used for JEE applications -->
      <bean id="transactionManager"
      class="org.springframework.transaction.jta.JtaTransactionManager">
      <property name="autodetectTransactionManager" value="true" />
      </bean>

      <bean id="personDAO" class="com.dyna.frm.controller.dao.hibernate.PersonDAOImpl">
      <property name="sessionFactory" ref="sessionFactory" />
      </bean>

      <bean id="sessionFactory"
      class="org.springframework.orm.hibernate3.annotation.AnnotationSessionFactoryBean">
      <property name="dataSource" ref="dataSource" />
      <property name="packagesToScan">
      <list>
      <value>com.dyna.frm.**.*</value>
      </list>
      </property>
      <property name="hibernateProperties">
      <ref bean="defaultHibernateProps" />
      </property>
      </bean>


      <!-- Hibernate properties bean -->
      <bean id="defaultHibernateProps"
      class="org.springframework.beans.factory.config.PropertiesFactoryBean">
      <property name="properties">
      <props>
      <prop key="hibernate.dialect">${dyna.frm.db.hibernate.dialect}</prop>
      <prop key="hibernate.show_sql">${dyna.frm.db.show.sql}</prop>
      </props>
      </property>
      </bean>

      </beans>


      Note that here i have used JTA transactions and as i am running this within jboss i have used the autodetectTransactionManager property.

      One notable thing here is that within the sessionFactory bean definition i have used the attribute packagesToScan. Why i have defined this way is because now i do not need to define each annotated class individually as Spring will scan all sub packages within com.dyna.frm so that all classes that are annotated with @Entity will be enclosed. I have used PropertyPlaceHolder to get the dialect names and other parameters.

      Thats it. If you have any queries do drop a comment.

      Wednesday, June 30, 2010

      Hibernate's AnnotationSessionFactoryBean

      These days im a bit busy with creating a new framework to be used for development of enterprise projects. I was using the hibernate template to deal with all database related activity and used the HibernateDAOSupport class as well. When configuring it at first i found it to be very cumbersome because you have to specify each and every annotated class within its configuration as such;


      <bean id="sessionFactory"
      class="org.springframework.orm.hibernate3.annotation.AnnotationSessionFactoryBean">
      <property name="dataSource" ref="dataSource" />
      <property name="annotatedClasses">
      <list>
      <value>com.mypackage.domain.Person</value>
      </list>
      </property>

      </bean>


      First i thought i found use xDoclet and generate this XML through the build process. But as I Googled up on the same i found that there was another way to do it in just one line which would scna all your sub packages. You just have to give your base package name and that its. Following is the re factored AnnotationSessionFactoryBean configuration;


      <bean id="sessionFactory"
      class="org.springframework.orm.hibernate3.annotation.AnnotationSessionFactoryBean">
      <property name="dataSource" ref="dataSource" />
      <property name="packagesToScan">
      <list>
      <value>com.mypackage.**.*</value>
      </list>
      </property>

      </bean>


      Thats it. Now you can put your domain classes anywhere within your project and this will scan all your entities.

      Wednesday, June 23, 2010

      Some HTML Tags We Rarely Use

      Found this article on some of the HTML tags we rarely use which is useful in come occasions. Check this out.

      Friday, June 18, 2010

      Java Script Charting Framework

      Found this site on dZone giving developers a powerful java script charting framework to work with.. I will definitely be trying this out as it feels much richer than JFree Chart...

      Thursday, June 17, 2010

      AOP with Spring

      One thing to note about Spring AOP is that it does runtime weaving of aspects compared to AspectJ's compile time weaving. The good thing is you can define your aspects as java classes without having to learn yet another expression language if you were to use AspectJ. Ok here i just put together a small application to show how easy it is to set up aspects within your Spring applcation.

      First of all we will start with defining our service class;


      public class ChildService {

      public void advice(){
      System.out.println("Ok!!!!");
      }
      }


      This class simply defines one method called advice(). Our intention is to weave into the advice method of ChildService and advice the child before and after. Hence we will be using @Before and @After annotations within our Aspect to handle this. If you do remember if we were to do this without annotations we have to implement BeforeAdvice, AfterAdvice within our Aspect class. But with annotations its a mere fact of defining a class and annotating it.

      Following is the Aspect which will weave into the advice() method of the ChildService class.


      import org.aspectj.lang.annotation.After;
      import org.aspectj.lang.annotation.Aspect;
      import org.aspectj.lang.annotation.Before;
      import org.aspectj.lang.annotation.Pointcut;

      @Aspect
      public class AdviceChild {

      @Pointcut("execution(* *.advice(..))")
      public void adviceChild(){}

      @Before("adviceChild()")
      public void beforeAdvicing(){
      System.out.println("Listen Up!!!!");
      }

      @After("adviceChild()")
      public void afterAdvicing(){
      System.out.println("You got that ?");
      }


      }


      As you can see here i have first annotated the advice class with @Aspect. This tells the Spring container that this is an aspect. Then we denote out point cut to tell at what point we are to use this Aspect. The pointcut is defined to weave into methods that have the name advice with any parameters.

      Then we simply define the @Before and @After annotations on our methods to say what needs to happen before and after the method execution. The value specified within these annotations is the name of the pointcut which is derived from the method name that we specify the @Pointcut annotation on in this case being adviceChild().

      Ofcourse there is another annotation called @Around which we can use so that we do not need @Before or @After. A code snippet on how to use @Around is given below;


      @Around("adviceChild()")
      public void aroundAdvice(ProceedingJoinPoint jp){
      System.out.println("Listen Up!!!!");
      try {
      jp.proceed();
      } catch (Throwable e) {
      e.printStackTrace();
      }
      System.out.println("You got that ?");
      }


      One point to note is that the method you annotate with @Around should have a ProceesingJoinPoint as a method parameter.


      Lastly we need to tell the Spring container about our advice.We could either just wire the bean
      named AnnotationAwareAspectJAutoProxyCreator which is a BeanPostProcessor
      or we could simply use the custom configuration element provided by spring in the aop namepsace. Hence the configuration will be as follows;


      <?xml version="1.0" encoding="UTF-8"?>
      <beans xmlns="http://www.springframework.org/schema/beans"
      xmlns:xsi="http://www.w3.org/2001/XMLSchema-instance" xmlns:aop="http://www.springframework.org/schema/aop"
      xsi:schemaLocation="http://www.springframework.org/schema/beans
      http://www.springframework.org/schema/beans/spring-beans-2.0.xsd
      http://www.springframework.org/schema/aop
      http://www.springframework.org/schema/aop/spring-aop-2.0.xsd">


      <aop:aspectj-autoproxy />

      <bean id="childServ" class="ChildService"/>

      <bean id="chdAdviceAspect" class="AdviceChild"/>

      </beans>


      If you wanted to go with complete XML configuration without using annotations then your XML configuration will be as follows;


      <?xml version="1.0" encoding="UTF-8"?>
      <beans xmlns="http://www.springframework.org/schema/beans"
      xmlns:xsi="http://www.w3.org/2001/XMLSchema-instance" xmlns:aop="http://www.springframework.org/schema/aop"
      xsi:schemaLocation="http://www.springframework.org/schema/beans
      http://www.springframework.org/schema/beans/spring-beans-2.0.xsd
      http://www.springframework.org/schema/aop
      http://www.springframework.org/schema/aop/spring-aop-2.0.xsd">


      <bean id="childServ" class="ChildService" />

      <bean id="chdAdviceAspect" class="AdviceChild" />

      <aop:config>
      <aop:aspect ref="chdAdviceAspect">
      <aop:pointcut id="advice" expression="execution(* *.advice(..))" />
      <aop:before method="beforeAdvicing" pointcut-ref="advice" />
      <aop:after-returning method="afterAdvicing"
      pointcut-ref="advice" />
      </aop:aspect>
      </aop:config>
      </beans>


      If your defining it with XML then you do not need to have the annotations within your
      AdviceChild class. This approach is cleaner too because then you can use any plain
      old class as an Aspect.


      Note that if you were to define aspects the old fashioned way then you need to create a ProxyFactoryBean to represent your bean which you need to weave in your advice and inject your advice class as an interceptor name. This is very cumbersome as you need to define this to each and every bean you want to weave in your advice to. And hence this approach i have given here required very less XML and is not at cumbersome as the ProxyFactoryBean method.

      And lastly i give you a test class for you to see a running configuration.


      public class AspectTester {

      /**
      * @param args
      */
      public static void main(String[] args) {

      ApplicationContext appContext = new ClassPathXmlApplicationContext("appContext.xml");
      ChildService chldService = (ChildService)appContext.getBean("childServ");
      chldService.advice();
      }

      }


      Thats it guys. If there are any queries do drop a comment.

      Cheers!!!!

      Wednesday, June 16, 2010

      Defining Custom Editors With Spring

      Custom editors gives you a lot of flexibility and reduces XML configuration when defining your spring beans. Say for example i have the following Person object;


      public class Person {

      private String firstName;

      private String lastName;

      private int age;

      public String getFirstName() {
      return firstName;
      }

      public void setFirstName(String firstName) {
      this.firstName = firstName;
      }

      public String getLastName() {
      return lastName;
      }

      public void setLastName(String lastName) {
      this.lastName = lastName;
      }

      public int getAge() {
      return age;
      }

      public void setAge(int age) {
      this.age = age;
      }


      }


      And the following Class called PersonManager is using this Person object as follows;


      public class PersonManager {

      private Person person;

      public Person getPerson() {
      return person;
      }

      public void setPerson(Person person) {
      this.person = person;
      }


      }


      If you wanted to inject a person object to the PersonManager class then you would first register the Person class as a spring bean and register that bean as a ref bean of PersonManager class.

      But spring offers an easy way of injecting the Person object to the PersonManager by use of Custom PropertyEditors. With this you can define your values as a string value and create the Person object as you deem appropriate from the format you define. In my example i have defined the format to be;
      firstname,lastname,age
      hence is would be comma separated values which defined the values needed to create the Person object. Now in order to let spring understand how to handle this string value you need to define your own propertye editor. It is as follows;


      public class PersonPropertyEditor extends PropertyEditorSupport{

      @Override
      public void setAsText(String arg0) throws IllegalArgumentException {

      String[]vals = arg0.split(",");
      Person p = new Person();
      p.setFirstName(vals[0]);
      p.setLastName(vals[1]);
      p.setAge(Integer.valueOf(vals[2]));
      setValue(p);
      }
      }


      Here i simply split the string value and set the relevant values of the Person object and then call the setValue inherited method to set the value. Its as simple as that.

      And finally you define your customer registar which binds your customer editor.


      public class PersonConfiguratorWithRegistars implements PropertyEditorRegistrar {
      @Override
      public void registerCustomEditors(PropertyEditorRegistry arg0) {
      arg0.registerCustomEditor(Person.class, new PersonPropertyEditor());

      }
      }


      Now when letting spring know about your custom editor there were two ways initially before Spring 3.0. They are;

      1. Define as a customEditors property within org.springframework.beans.factory.config.CustomEditorConfigurer
      2. Define as a propertyEditorRegistrars within org.springframework.beans.factory.config.CustomEditorConfigurer
      As of Spring 3.0 the customerEditors property is deprecated as they had a thread locking issue as explained here.

      So lastly i show you how to wire your new customer editor and the PersonManager object by providing a string value. The application context XML is as follows;


      <?xml version="1.0" encoding="UTF-8"?>
      <beans xmlns="http://www.springframework.org/schema/beans"
      xmlns:xsi="http://www.w3.org/2001/XMLSchema-instance"
      xsi:schemaLocation="http://www.springframework.org/schema/beans
      http://www.springframework.org/schema/beans/spring-beans.xsd">

      <!--

      This is the OLD way of wiring your custom editor which is not thread safe

      <bean class="org.springframework.beans.factory.config.CustomEditorConfigurer">
      <property name="customEditors">
      <map>
      <entry key="Person">
      <bean id="personEditor" class="PersonPropertyEditor">
      </bean>
      </entry>
      </map>
      </property>
      </bean>

      -->

      <bean class="org.springframework.beans.factory.config.CustomEditorConfigurer">
      <property name="propertyEditorRegistrars">
      <list>
      <ref bean="customPersonPropertyEditor" />
      </list>
      </property>
      </bean>

      <bean id="customPersonPropertyEditor"
      class="PersonConfiguratorWithRegistars" />

      <bean id="perMgt" class="PersonManager">
      <property name="person" value="John,Alan,23" />
      </bean>


      </beans>


      Thats it. You can use the following test class to test the same;


      public class PropertyEditorTest {

      /**
      * @param args
      */
      public static void main(String[] args) {
      ApplicationContext appContext = new ClassPathXmlApplicationContext("appContext.xml");
      PersonManager personMgr = (PersonManager)appContext.getBean("perMgt");
      Person p = personMgr.getPerson();
      System.out.println(p.getFirstName()+" "+p.getLastName()+" "+p.getAge());
      }

      }

      Thursday, June 10, 2010

      A Simple Json Utility Class Using Gson

      In my current project we planned to go with Gson(Google's json manipulating library) to handle out json manipulation within our application. Hence i wrote this small utility class to ease the use of Gson within the project.


      import com.google.gson.Gson;
      import com.google.gson.GsonBuilder;

      /**
      * This class is used as a Json utility. The base functionality comes from the Gson<br>
      * package from Google. It is made generic due to the fact that many clients may use<br>
      * this class at any given moment.
      *
      * @author dinuka
      * @param <T>
      */
      public class Jsonutil {

      /**
      * Null serialize is used because else Gson will ignore all null fields.
      */
      private static Gson gson = new GsonBuilder().serializeNulls().create();

      /**
      * Made private because all methods are static and hence do not need
      * object instantiation
      */
      private Jsonutil() {}
      /**
      * To Json Converter using Goolge's Gson Package<br>
      * this method converts a simple object to a json string<br>
      *
      * @param obj
      * @return a json string
      */
      public static <T> String toJsonObj(T obj) {
      return gson.toJson(obj);
      }

      /**
      * Converts a collection of objects using Google's Gson Package
      *
      * @param objCol
      * @return a json string array
      */
      public static <T> String toJsonList(List<T> objCol) {
      return gson.toJson(objCol);
      }

      /**
      * Returns the specific object given the Json String
      * @param <T>
      * @param jsonString
      * @param obj
      * @return a specific object as defined by the user calling the method
      */
      public static <T> T fromJsonToObj(String jsonString,Class<T>obj) {
      return gson.fromJson(jsonString, obj);
      }

      /**
      * Returns a list of specified object from the given json array
      * @param <T>
      * @param jsonString
      * @param t the type defined by the user
      * @return a list of specified objects as given in the json array
      */
      public static <T> List<T> fromJsonToList(String jsonString,Type t){
      return gson.fromJson(jsonString, t);
      }

      }


      Typical usage of the given utility class is as follow;


      import java.lang.reflect.Type;
      import java.util.ArrayList;
      import java.util.List;

      import com.google.gson.reflect.TypeToken;


      public class Test {


      public static void main(String[] args) {
      Person p = new Person();
      p.setFirstName("xxx");
      p.setLastName("yyy");

      List<Person>pList = new ArrayList<Person>();
      pList.add(p);

      String jsonStr = JsonUtil.toJsonList(pList);

      System.out.println("Person List as Json Array = "+jsonStr);

      Type collectionType = new TypeToken<List<Person>>(){}.getType();
      List<Person>personList = JsonUtil.fromJsonToList(jsonStr,collectionType);
      System.out.println("Person List from json String array = "+personList);

      String personJsonStr = JsonUtil.toJsonObj(p);
      System.out.println("Json String from person = "+personJsonStr);

      Person p1 = JsonUtil.fromJsonToObj(personJsonStr, Person.class);
      System.out.println("Person from json String = "+p1);

      }


      }

      class Person{
      private String firstName;
      private String lastName;
      /**
      * @return the firstName
      */
      public String getFirstName() {
      return firstName;
      }
      /**
      * @param firstName the firstName to set
      */
      public void setFirstName(String firstName) {
      this.firstName = firstName;
      }
      /**
      * @return the lastName
      */
      public String getLastName() {
      return lastName;
      }
      /**
      * @param lastName the lastName to set
      */
      public void setLastName(String lastName) {
      this.lastName = lastName;
      }
      /* (non-Javadoc)
      * @see java.lang.Object#toString()
      */
      @Override
      public String toString() {
      return "Person [firstName=" + firstName + ", lastName=" + lastName + "]";
      }


      }


      Thats it guys. If you have any queries or possible enhancements you can see, please do leave a comment.